Ever wondered what makes your Xbox One controller tick? Or maybe you’re just tired of that sticky button that’s ruining your gaming experience. Disassembling your controller might sound daunting, but it’s easier than you think—like peeling a banana, but with fewer potassium benefits.
Tools Required For Xbox One Controller Disassembly
Disassembling an Xbox One controller requires specific tools to ensure efficiency and prevent damage. The primary tool is a Torx T8 screwdriver, which fits the security screws on the back panel. Next, a small Phillips screwdriver facilitates access to internal components.
An opening tool, such as a plastic spudger, helps to pry apart the controller without scratching surfaces. Additionally, a flat tool offers leverage while minimizing the risk of bending clips during the process. Using tweezers proves advantageous for handling small screws and components during disassembly.
A soft microfiber cloth should be on hand for protecting surfaces and components from scratches. Finally, a container assists in keeping screws organized, ensuring none are lost during assembly.
Here’s a summary table of the required tools:
| Tool | Purpose |
|---|---|
| Torx T8 screwdriver | Unscrewing the back panel security screws |
| Phillips screwdriver | Accessing internal components |
| Plastic spudger | Prizing apart the controller |
| Flat tool | Leveraging to avoid bending clips |
| Tweezers | Handling small screws and components |
| Microfiber cloth | Protecting surfaces and components |
| Container | Keeping screws organized |
Gathering these tools before starting simplifies the disassembly process. Each tool serves a distinct purpose, ensuring a smoother experience while troubleshooting sticky buttons or other issues.
Step-by-Step Guide To Disassemble The Xbox One Controller
Disassembling the Xbox One controller involves a series of straightforward steps. Following this guide ensures proper handling of each component while addressing issues like sticky buttons.
Removing The Back Cover
Start by turning the controller face down. Locate the seam around the edges of the back cover. Use the plastic spudger to carefully pry the cover away, starting at any corner. Apply gentle pressure to avoid breaking clips. Once the cover is loose, continue working your way around until it fully detaches. Set the back cover aside, ensuring it stays clean and free from scratches.
Unscrewing The Internal Screws
Once the back cover is off, access the internal screws located in key areas. A Torx T8 screwdriver is essential for removing the security screws found at the back of the battery compartment. After removing these, find additional Phillips screws securing the circuit board. Use the Phillips screwdriver to take these out, remembering to keep screws organized in a container. Avoid losing screws as these are critical for reassembly.
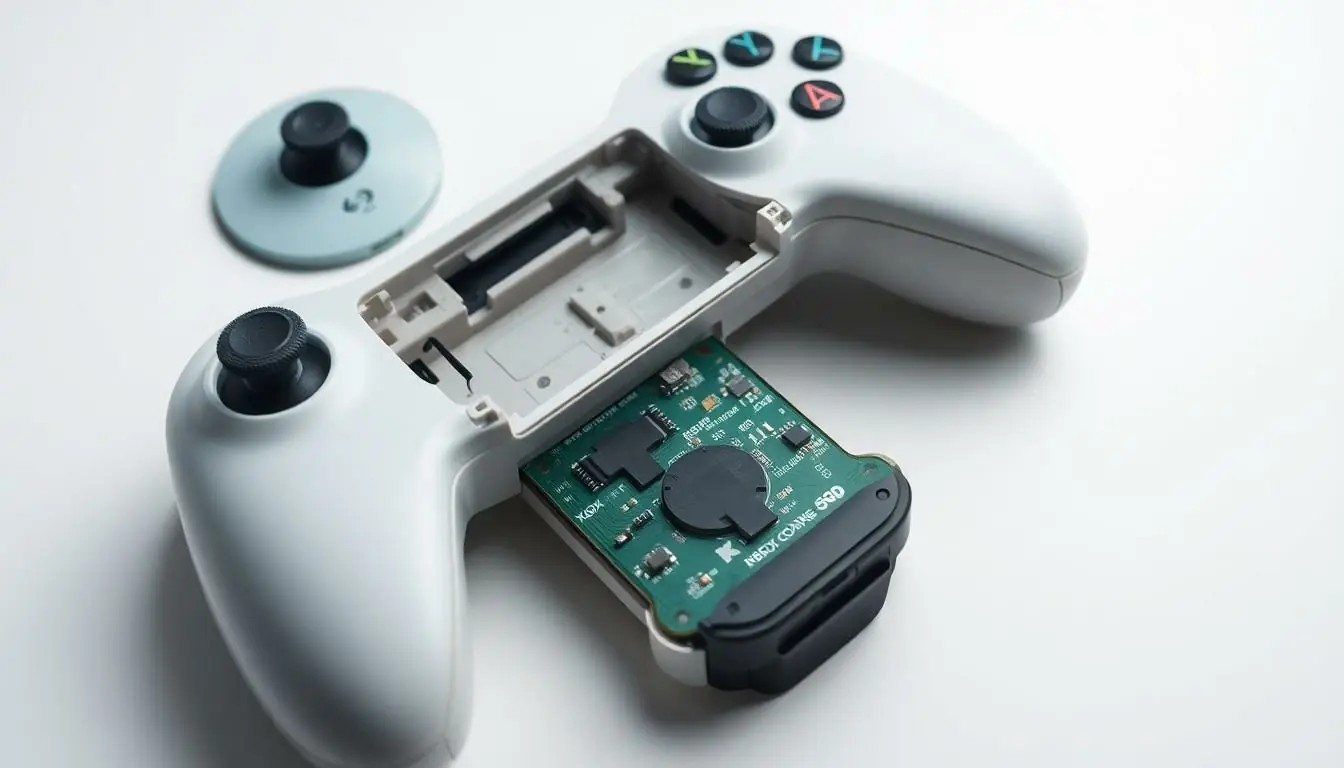
Detaching The Circuit Board
Next, carefully lift the circuit board away from the front casing. It’s crucial to check for connecting wires that may still be attached. Gently disconnect any ribbon cables using tweezers, if necessary. Ensure these connections are not damaged during removal. After fully detaching the circuit board, place it on a clean, soft surface to prevent scratches or damage. This step allows for access to the internal components and potential troubleshooting.
Common Issues During Disassembly
Disassembling an Xbox One controller may present challenges. Addressing those issues proactively simplifies the process.
Overcoming Stubborn Parts
Stubborn parts can hinder progress. Using heat may help loosen adhesive components, making them easier to detach. Gently twisting with the plastic spudger reduces the risk of damaging plastic clips. Patience proves crucial; forcing parts apart may lead to breakage. Another option involves wetting adhesive areas with isopropyl alcohol. A careful approach prevents frustrations during disassembly while increasing the success rate.
Avoiding Damage To Internal Components
Protecting internal components is vital during disassembly. Always detach wires by gripping their connectors, avoiding direct pulls on the wires themselves. Using the appropriate tools minimizes the chance of scratches or cracks on circuit boards. Maintaining a clean workspace prevents dirt or debris from affecting sensitive parts. Inspecting components visually beforehand helps identify potential fragility. Ensuring a secure grip while lifting parts aids in avoiding mistakes that could compromise functionality.
Reassembly Process After Disassembly
Reassembling the Xbox One controller requires careful attention to the components. Begin by laying the circuit board back into the controller’s shell. Ensure that all connectors align properly before securing it with screws.
Next, use the Phillips screwdriver to replace the internal screws, maintaining their organization is essential for efficiency. Confirm that each screw fits tightly to prevent any loose components during use.
After the screws are in place, position the back cover over the circuit board. Align the edges and apply gentle pressure to snap it securely into place.
In case the cover doesn’t fit easily, inspect the alignment of the circuit board. Adjust any misaligned parts before reapplying the back cover.
Use the plastic spudger if necessary to ensure a snug fit, taking care not to scratch the surface. Test the buttons for functionality before proceeding to the final step.
Finally, perform a visual check of the entire controller to confirm every part is correctly assembled. Ensure all buttons function smoothly when pressed. With thorough inspection, the controller can provide a seamless gaming experience once reassembled.
Conclusion
Disassembling an Xbox One controller can be a rewarding experience that enhances understanding of its mechanics. With the right tools and a bit of patience, anyone can tackle common issues like sticky buttons or internal repairs. The step-by-step guide simplifies the process, making it accessible even for those new to tech repairs.
By following the outlined precautions and techniques, users can ensure a successful disassembly and reassembly, ultimately leading to a smoother gaming experience. Keeping a clean workspace and organized components further contributes to the ease of the task. Embracing this hands-on approach not only fixes problems but also fosters a deeper appreciation for the technology behind gaming controllers.